QUILTS & FABRIC: PAST & PRESENT


Wednesday, July 31, 2013

Ragtime Opportunity Quilt

Ragtime,
Kaw Valley Quilters Guild,
The Sewhatevers.
Quilted by Lori Kukuk
2013


I'm showing you our guild fundraiser because it's going to some lucky new owner soon.

The Sewhatevers volunteered to make this year's quilt.
We started with a square in a square in a square.
Sarah's been working with this block and just basic color for awhile.


The pattern is BlockBase number 2376 and has been published with several names over the years.
The Ladies' Art Company called it "Hour Glass" about 1900.
Carrie Hall called it "Economy Patch" in 1935.
The Kansas City Star published it as "This and That" in 1944.
and about the same time Nancy Cabot in the Chicago Tribune called it "Thrift Block."

We ignored the thrifty implications of those old names and bought a whole bunch of new fabric in batik style, hand-dyes and prints that look like hand-dyes.

We made a lot of 6-inch blocks, paper-piecing them over foundations.


I'm using the editorial we here. My job was pulling out the paper.

Sarah Fayman's version was our inspiration.


Here's our first idea for a set: Set it side-by-side just like Sarah's. But we realized that joining so many blocks by so many different stitchers makes lining up the points and corners problematic. Sarah's works because she sewed all the blocks herself (and because she is a great stitcher.)

We'd be better off with a sashing to separate all those points.
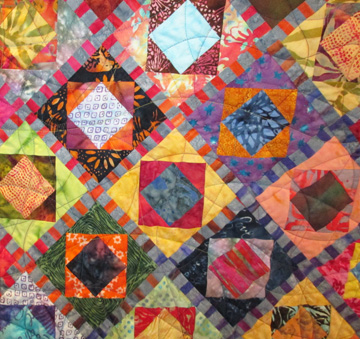
The color experts picked a stripe, a new-fashioned rainbow type of print and we placed the blocks on point.

Here's a detail

We called it Ragtime and donated it to the Kaw Valley Quilt Guild as a programming fundraiser.
A name will be drawn out of a hat at our annual retreat on September 16, 2013.


If you'd like your name in that hat we'd be glad to take your money.
Email Liz and she will tell you how this quilt could be yours.
Tell her you are interested in the Ragtime Quilt.


Sunday, July 28, 2013

Chintz Borders: The 9%

Quilt date-inscribed 1881
An outlier, part of the 9%.

A couple of weeks ago I did a post about chintz borders as a clue to a quilt's age.

Quilt date-inscribed 1844

In that post I quoted my Clues in the Calico book


"Of 35 quilts in the database with borders of large pieces of floral chintz 32 (91%) were dated between 1800 and 1860."

But what about the 9 percent after 1860?

The triangles in this charm quilt have the characteristic, black, blue and gray color scheme popular
in the 1890-1920 period, but the border of large-scale furnishing fabric seems an anachronism.

After 1880 quilters were most likely to use calico-scale fabrics
for borders if they added borders at all.

Late 19th century with no border


Late 19th century with calico border

After 1870 you start seeing an emphasis on small pieces and a variety of dress-scale size prints
rather than on large-scale fabrics.

Late 19th century with
Calico pieced border


Crazy quilt about 1900 with cretonne backing

Lots of large-scale fabric was available but if quilters used it at all they were likely to use it on the reverse of the quilt.

So a chintz-scale border is a pretty good dating clue to a date before 1865---
91% of the time.

Double Four Patch probably mid-19th century

How to tell if the quilt above is early or late 19th-century?
You have to rely on the fabric.
There are differences between furnishing prints in 1830 and 1880
and the Quilt Detective has to learn to recognize them.

Quilt bordered with a cretonne
About 1880-1900

The later large-scale prints were called Cretonne in the vernacular.
They have color schemes, drawing styles and printing styles different from earlier chintzes.

Chintz patchwork from the first half of the
19th-century.

Cretonne from the end of the 19th century

Color is a good clue---many end-of-the-century prints used a distinctive pink, tan and golden brown palette
The black background here is also a clue.You just don't see true blacks as backgrounds in cotton prints
till the very end of the 19th century.

See a post I did about cretonnes here:


Drawing style is a subtle clue too.
This painterly style design just looks too modern to be
1860s or earlier.


Thursday, July 25, 2013

Steel Pen Drawing of Abraham Lincoln for Quilters


Lincoln Mourning Fan
President Abraham Lincoln's assassination right after Civil War peace threw the Union into deepest mourning in spring, 1865.

See more of that spectacular fan here:

Lincoln's elaborate funeral cortege crossed the country from Washington City to his home in Springfield, Illinois. Here in Chicago 36 women dressed in white with black ribbons represent the states as they march under a mourning arch.
The Lincoln home in Springfield hung with black crepe.

Mourning envelope

Many homes framed a Lincoln memorial lithograph for the parlor.


And many of those lithographs linked the martyred President to 
the Emancipation Proclamation.
In looking for images of Lincoln for my Moda Civil War Jubilee collection I came across this style of mourning picture, which rang a bell in my memory.

These portraits were done in steel-pen calligraphic script.

The words of the document are written in calligraphy and shaded to form what
was called an Allegorical Portrait, 
 also called a calligraphic portrait or a steel-pen portrait.

There are two sources for these published calligraphic Lincoln portraits. The most common were drawn by William H. Pratt and lithographed by A. Hageboeck in Iowa. Others are attributed to E. C. Smith. Some say the Pratt portraits are from 1865; others say 1867.


Pratt also did an Allegorical Portrait of Washington
using the words of the Declaration of Independence.


Several of the lithographs here are from the Library of Congress collection.

An early 20th-century version
shows three martyred Presidents
at the top, Garfield, Lincoln & McKinley.


Some calligraphic portraits attributed to Pratt do not show his skillful drawing.
This one may have been hand drawn.

During the 1970s I interviewed a woman more than 100 years old about a quilt she'd made when she was young. I remember her farm house with no electricity or plumbing. I can still picture Bertha sitting on her couch under a similar portrait on the parlor wall. After I explained to her that I worked at the University she gestured towards the Lincoln portrait and told me her brother had drawn that picture when he went to college there, perhaps in the 1880s. Her question for me:

"Do they still teach that kind of drawing at the University?"

Taken aback, I decided not to tell her about abstract expressionism or pop art and just said I didn't think they taught it anymore. She thought that was a shame.

I think that was the closest I ever came to the 19th century.

Calligrapic portrait atop Lincoln's Legacy print
 (#8256) from
Civil War Jubilee

I thought a portrait might make a great center for a small medallion celebrating the 100th anniversary of the Emancipation Proclamation so I took the largest picture I could find and turned it into a printable image for pre-treated cotton and ink-jet printers.

Click on the picture below and save it to a Word file or as a JPG. Print it out 8-1/2 x 11". It's a little fuzzy so you might want to print it smaller. The banner says "Emancipation Proclamations" (plural) because the print  referred to both the September, 1862 and January, 1863 versions.


Find printable fabrics at Electric Quilt by clicking here:

Monday, July 22, 2013

Cutting Corners with Civil War Jubilee

Dorothy Barker enjoys the unusually nice
porch weather in Kansas this July.

Behind her is a little quilt top I made from a Charm Pack of my Moda line Civil War Jubilee plus some extra yardage. The Octagon or Snowball block is an old pattern that I did in new techniques: the stitch-and-cut method---perfect for pre-cut squares.
See the free quilt pattern below.

Cutting Corners
Barbara Brackman
39-1/2" Square
Charm Packs include 42 squares cut 5" x 5".

My inspiration was this Civil-War era photograph from an online auction.

See more about the photo and the pattern at my Civil War Quilts blog:

I'm guessing the pattern in the picture is a block 
with the corners cut off to make an octagon.
The original alternated light and dark blocks.

More like this 20th century version.

Sue Garman has an old top quite a bit like the photo.
She her reproduction of it here:

Civil War Jubilee is a dark collection so I didn't have any lights. But I wanted to add a little zip---19th-century zip. They often used chrome yellow and double pink prints for contrast. I had some in my stash of reproduction prints.

You start with 2 squares, big and small. Each block finishes to 4-1/2"

Fabric Requirements:

  • Big squares: 1 Charm Pack (42 Squares precut to 5-inches).
  • Small squares: 1/4 Yard each of two contrasting colors.
For a reproduction look cut the corners with light prints like chrome yellow & double pink.

  • Inner Border- 2/3 yard. (I used yellow.)
Outer Border—Mitered & cut along selvage: 

  • 1-1/4 Yards Paisley stripe. 
The red paisley on top of the Charm Pack makes a great period border 

 Birds in the Air print in madder red.
(Moda #8257-12).


CUTTING & MARKING BLOCKS
1. Use the 5” square Charm squares for the big square. I picked 36 from the pack.
2. For the small squares cut 2” squares: 72 of one color and 72 of another.
3. On the reverse of each small square draw a diagonal line corner to corner.


SEWING & TRIMMING THE BLOCKS


1. Place the small squares in the corners of the large square face to face with pencil lines as shown.
     Stitch right on those lines.


2. Before pressing, trim both layers of each corner by cutting 1/4” outside the stitching line.


3. Press open the triangles.

5. Alternate blocks with pink and yellow corners and stitch a 6 x 6 grid.


The inner border finishes to 1".
The outer border finishes to 5-1/4".

CUTTING BORDERS

Inner Yellow Border: Cut 2 strips 1-1/2” x 27-1/2”.
Cut 2 strips 1-1/2” x 29-1/2”.

Outer Mitered Border: Cut 4 strips 5-3/4” x 40”.
Fussy cut dark stripes parallel to selvages leaving the lightest stripe hidden in the seam. Miter the corners.

The white lines indicate how I fussy cut the 5-3/4" strips. The strip with the "X" I set aside for a small border for some other project.

Here are other ideas for the same pattern.  Other Charm Packs????

Octagons
By Carol Gilham Jones
Carol used some of my William Morris repro prints for a full-sized quilt. Her smaller squares are contrasting, almost-solid-color fabrics and she alternated the corner colors. You could try this with a Layer Cake of 10" squares. I think you'll need a design wall too.

You could try this with a Layer Cake of 10" squares.

An antique from the end of the 19th century.

Another from the early 20th-century.


You can get the same effect by piecing a square between the octagons, but I think the block method makes it easier to piece. I pieced mine by hand---something I love to take with me. Taking the above quilt with you as you work on it would involve dragging around a pretty big project.

Here's one from the Connecticut Quilt Project and the Quilt Index that uses Turkey red and plain white for the corners, another period look.