

Alice's four patch
When Alice Browne was nine in the 1860s she began a four-patch quilt.


from which we drew many of the prints in my latest Moda reproduction
collection Alice's Scrapbag.
I sketched Alice's Four Patch out in Electric Quilt 7 and give you a free quilt pattern below.
Fabric Required for the Blocks.

- A package of fat quarters.
- Or your scrapbag of 1850-1870 repro prints.
- 3/4 yard extra of a light print or a plain white for the lightest squares.

Alice's Four Patch
About 72" square
12" Blocks
4" Sashing
2" Border
The Blocks

Each of Alice's blocks finished to about 12" square.
Notice she used a plain white as her lightest shade but you could use the lightest print in the collection. She rotated the blocks randomly when she set the quilt.

The block is a double four-patch.
There are 25 complete four-patches in Alice's quilt
Cutting Instructions

For each four patch finishing to 12":
A - Cut 2 squares 6-1/2"
B- Cut 4 squares 3-1/2" of dark and 4 squares 3-1/2" of light.
Setting the Blocks
Alice seems to have set the blocks she pieced in the 1860s into a quilt about 20 years later. She placed them on the diagonal and continued the four patch design out to the edge---the pattern for her set is below.
You might want to frame the center with dark unpieced squares. First I am going to give you the pattern for the easier quilt. At the bottom is the pattern for Alice's edges.

Alice's Four Patch
Alternate Edge

EQ7 says you need 3/4 yard for the dark edges.
Cut each twice diagonally to make 4 triangles.

You need 4 corner triangles. Cut 2 squares 9-3/8" and cut each in half diagonally to make 2 triangles.

Sashing and Border

We didn't do a reproduction print of Alice's actual sashing because she set the quilt together later. But one of the pinks or reds would capture the look of Alice's original.

#8316-15
Baby's Pantalettes
Fabric - 3-1/2 yards for sashing and border.
Sashing: There are two ways to sash this. I'd sash it with strips and cornerstones, working in small sections.

Working this way you
can make frame the blocks as you go.
but Alice sashed it with long diagonal strips. (Dealing with strips 116" long is never fun.)

For the cornerstone version:
Cut 57 sashing strips 4-1/2" x 12-1/2".
Cut 24 cornerstones 4-1/2" x 4-1/2".
For the edge triangles cut 4 squares 5-1/4". Cut each twice diagonally to make 4 triangles. You need 16 triangles.
For Alice's version with long strips

Cut 32 sashing strips 4-1/2" x 12-1/2".
Cut pairs of strips 4-1/2" by the sizes shown below. After you sew the top together trim the edges of each strip at a 45 degree angle.

Border:
(I'd cut these a little longer and trim them after measuring the final top.)
For the sides: Cut 2 strips 2-12/" x 68-3/4".
For the top and bottom: Cut 2 strips 2-12/" x 72 1/2".

Pattern for Alice's Edges
For the 12 Side Triangles
Alice probably cut her double four-patches in half to make those side triangles, but we are going to plan ahead by piecing a triangle of B and C.

You need 12 single four-patches. Using the measurements for B above (cut 3-1/2" x 3-1/2") make 12 of these four patches finishing to 6" square.

For the C triangles: Cut 6 squares 7-1/4" and cut each twice diagonally to make 4 triangles. You need 24 triangles.

(I think this is the best way to get those triangles so you don't have
a bias cut along the edge.)
For the 4 Corner Triangles
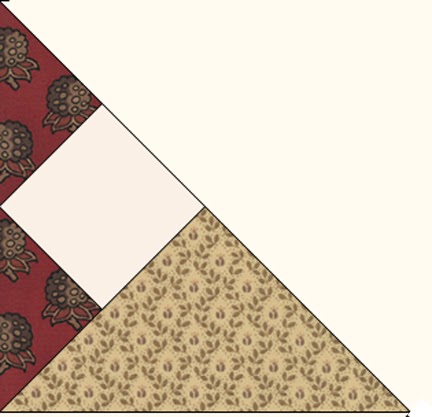
You need 4 light squares B (cut 3-1/2" x 3-1/2").
You need 4 C triangles (see the corners where 2 are light and 2 are dark). Again it's probably best to cut squares 7-1/4" and cut each twice diagonally to make 4 triangles to avoid bias in the corner edges.
You also need 8 D triangles.
Cut 2 squares 4-1/4" and cut each twice diagonally to make 4 triangles to avoid bias in the corner edges.

Piece those together for the corners.

Alice Blue Four-Patch
Another version emphasizing the blues in the line

with the blue colorway of Mama's Apron for side
triangles and border.

I Photoshopped Alice's quilt onto this stereocard
photo of a girl sewing patchwork about 1890. The card
was produced by Underwood & Underwood.
Like Alice's quilt the photo probably came from Kansas.


