QUILTS & FABRIC: PAST & PRESENT


Showing posts with label Antique Quilts. Show all posts

Monday, January 9, 2012

Princess or Prince's Feathers, Whatever

These bold blocks are always intriguing.

There are so many variations.

It's wonderful to see so much individuality within a set of visual rules.

 
The rules are pretty simple: The arms have to rotate around a center.

There's a lot of variation possible in the center

 Each of the arms goes the same way, no flipping the pattern over.
In the example above the arms in the corners flip.

See why you can't flip the arms in a quilt from the McCord Museum by clicking here:

There can be eight arms rotating.
(See more about this quilt and the pattern at Karen Alexander's post


Minor rules: Serated edges on the arms or not


Six arms rotating.
Another rule: You can add stuff to the arms.

Flowers


Four arms with a star hanging off.

But one arm is too few.
Do you get the feeling someone inherited some pieces here without a clear view of the overall blueprint for the project?

See one on the Quilt Index that illustrates why the basic rule is rotate---no flipping.

Friday, September 30, 2011

Misdated Quilts


Dated quilts are helpful in training the Quilt Detective's eye.
But once in a while the date is wrong. This quilt, found in an online auction, is NOT from 1876.

The color scheme and the individual cottons offer good clues to the actual date when it was made---about 1890-1920.

Two of the easiest clues for a novice detective to learn are that the wine-colored red prints and the black-on- white prints above were a fad from about 1890-1920.  The red, which the dyers called cerise (French for cherry) and the marketers called claret, was quite popular around the turn of the last century. Characteristics are simple white figures on a wine-colored background.

The black and white prints (a true black) like the one above were not possible until about 1890 and were very fashionable in the first decades of the 20th century. This quilt, also recently in an online auction, is most likely 1890-1920. 
The pattern---Jacob's Ladder or Underground Railroad---was also very popular in the 1890-1920 decades.

Some of the fabrics, like a white dot on indigo, are no help in dating---too popular for too long. But the blacks and the wine-reds are excellent clues.

The black-and-white prints often read as gray. They were sometimes called mourning prints 100 years ago.

Someone (I'd guess the same someone) added the dates much later, probably using family history as the basis for her guess rather than any knowledge of when cotton prints were available. Another clue---black embroidery thread not used in the 1870s.

A very weak clue to date is the stitch used in both quilts. It's the way I embroider---what is that stitch??? A directionally-challenged chain stitch???


A better chain stitch that was probably actually embroidered in 1879

That crabbed stitch in black thread seems very "late-20th-century", but don't rely on that stitch as a basis for dating a quilt. Fabrics are your best clues. And the fabrics in the misdated quilts are 20 years later than the dates.

Friday, September 9, 2011

Sash and Block Designs

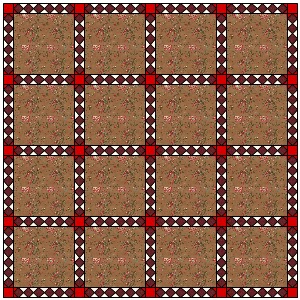
I've been thinking about good ways to show off the large prints in the Lately Arrived from London yardage. I found a file I've been keeping of antique quilts with unpieced blocks. The blocks are plain, the sashing is pieced. In my Encyclopedia of Pieced Quilt Patterns I called the format Sash & Block patterns.


Here a spiky triangle is pieced between unpieced Turkey red blocks.
Looks to be about 1900-1925 by the gray prints in it.

Here's another one that shows off Turkey red blocks with a sash of squares, probably turn of the 20th century.


The most common pieced sash between the plain blocks is a double sawtooth or flying geese. Again the sashing here looks to be about 1900-1925. The plain gray fabric may have been more colorful once.

This one framing double pink squares looks a little older-maybe 1860-1890.

Here's one from about 1880-1900 with flying geese triangles.

Below are EQ7 designs using a 12" finished square and the colors and prints in the Lately Arrived from London collection. For all of these cut the focus prints into squares 12-1/2"


The spiky triangle looks good if you alternate the colors in the unpieced blocks and rotate the strips to match. The red cornerstone squares are cut 2-1/2".
To cut the triangles cut 2-3/4" strips and then cut triangles as shown in this EQ diagram.


The side triangles in each strip can be cut like the above diagram.
The strip with the squares makes a star in the intersections if you color the triangles around the red cornerstone squares red to match.

For the squares cut 1-7/8" squares
For the larger triangles cut squares 2-1/4" and slice each into quarters with 2 diagonal cuts.
For the smaller triangles cut square 1-7/8" and slice each into 2 triangles with one diagonal cut.


A single sawtooth row between squares. 
Cut squares 2-7/8" and slice in half diagonally to piece into 2" sawtooth squares.
Cut cornerstone squares 2-1/2".


Use two rows of sawtooth to get this look. Rotate the strips of geese to get a balanced shading in the sashing.


Or make 12" finished strips of flying geese. Your cornerstones need to finish to 4" square if you use a wider sash, so cut plain cornerstone squares 4-1/2".

These geese form a 12" x 4" finished sashing.
Cut small triangles by cutting squares 2-7/8" and slicing in half diagonally to make 2 triangles.
Cut large triangles by cutting squares 5-1/4" and slicing each into quarters with 2 diagonal cuts.


One way to vary the look
is to set the squares and sashing on the diagonal.

These designs that highlight a large print would also be great with William Morris fabric as well as chintzes.

This print will be in my next William Morris reproduction line coming out in the fall. Click here to see more about Morris & Company.

See a post from last year for more about Sash and Block designs.

UPDATE. Robin at SolsticeStudio sent a link to her blog
Check out August 17 and 19th for her version of one of these quilts.
I don't know why the links to the specific posts won't work but scroll down to see a terrific quilt.

Friday, August 12, 2011

Dogtooth Stars How-To

Nineteeth-century quilters often free-cut stars for applique. The maker of this New Jersey album pictured in an online auction appliqued stars over the seam intersections. 

The quilt looks to be about 1840-1860.

Spiky Stars by Deb Rowden, 2009

Deb Rowden interpreted an antique quilt for the American Quilt Study Group's Red and Green study a few years ago, appliqueing 16 free-cut stars just as the maker of her inspiration quilt had done. This old-fashioned technique allows you to create an impulsive look that is quite refreshing in our era of templates. See her inspiration at Stella Rubin's online shop.


These stars all begin with a circle. Determine what size you want your finished star to be and cut a circle 3/8" larger or so. This is a great use for the Go!Baby Cutter so you might want to cut a bunch of 5" circles. In the past I used a jar lid for a template.

We'll cut an 8-pointed star first. Fold the circle in half and then half again, etc. till you have it folded into a pie-shaped piece that shows 1/8th of the circle. Just like cutting paper snowflakes.

Press it so the creases are really in there.
Before you unfold it take a scissors and snip it in the creases.

Use a sharp scissors and snip through all the layers right in the creases.
The longer your slash the spikier the points on your finished stars.

Open up your circle.
Baste it or glue it to the backround.


Create the star points by folding under those edges. Do not trim them. Fold them under and applique them down.

You can be as precise or spontaneous as you like.

You can also make a six pointed star.


I reverse appliqued a hole in the center. You can layer circles on top of the star or do reverse applique.
Notice the shadow of the folded-under points above. That's usually not a problem. My imitation chrome orange fabric is pretty thin.

The only difference in creating a six pointed star is in your initial folding of the circle. Fold it into sixths instead of eighths.


And then there is the five-pointed Betsy Ross star.
American children are taught to cut five-pointed stars with the legendary story of Betsy Ross cutting one for George Washington and the first American flag. Historical bunk, but a fun way to learn to cut a five-pointed star. Most of us forget immediately.

For a five-pointed star:


Again: Begin by folding the circle in half.

Then fold a piece over that is twice as wide as the section that is behind.
The proportions here are 1:2. The pinkish shape is twice as wide as the red shape visible here.

Fold the smaller flap backwards.
Press

This works better if you open it up before you slash it.
You'll see you have an extra line in the creases.

Ignore the extra crease.
Slash down the correct 5 creases.


The deeper the slash the sharper the points.
Fold under the points and hand applique.


In this block dated 1863 the maker laid a red five-pointed star atop a blue five-pointed star to get a 10-pointed star. There are many possibilities.....

See this great use of the free-cut star in another quilt from Stella Rubin by way of the Selvage Blog: