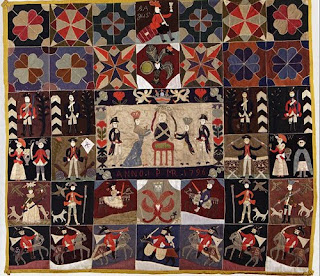
Quilted patchwork bed cover, England,
1690-1720, T.201-1984,
© V&A Images/Victoria and Albert Museum
The Victoria & Albert exhibit of quilts has inspired some discussion of the inlaid or intarsia technique, among the earliest types of patchwork. The quilt above has an estimated date of late-17th century to early 18th century. It is one of the oldest surviving examples of a patchwork bedcover.
See a two and a half minute slide show about the exhibit by clicking here:
http://news.bbc.co.uk/2/hi/entertainment/arts_and_culture/8578091.stm
Many early quilts feature areas of inlaid or intarsia applique.
See an earlier post about an exhibit just closed in Vienna with an emphasis on inlay work by clicking here:
Just what is intarsia? It's related to techniques in woodwork called parquetry, marquetry and inlay work and is done in much the same fashion, but patchworkers must add seams. Knitters also do intarsia work.
Jennifer Harris in Textiles, 5,000 Years: an International History and Illustrated Survey defined intarsia patchwork as "carefully cut segments of fabric…set into identically shaped openings cut in the ground fabric."
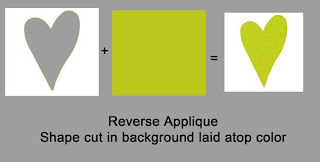
To clarify the differences in various patchwork techniques I drew some digital sketches. Say you want to create an image of a heart, a green heart on a white background square:
You have many options. The most common solution today would be to lay a green heart on the white background and stitch it down. What we call applique.
We could piece it by adding seams to the background and seam allowances to all the pieces.
You might want to make a paper template for each piece and baste or glue the seam allowance around the paper, then whip stitch the pieces together. But most of us today wouldn't do this with the old-fashioned paper piecing technique.
Another applique option is reverse applique, a technique common with early 19th-century American quilters and 20th-century Kuna women in Panama for their molas, but a solution not often used today.
The patchworker of the 18th-century seems to have considered inlay applique as his or her first option.
One cuts the same shape in the white background out of the green foreground; inserts the heart in the heart-shaped hole and stitches them together.
In woodworking the carpenter cuts a heart in ebony and a heart-shaped hole in cherrywood exactly the same size. No seams, just gluing and sanding
But for fabric one has to add seams because you wouldn't want raw edges showing. People seem to have cut a paper template the size of the finished heart, added a seam allowance when cutting the green heart, and basted the edges of the green heart over the paper.
It seems to me that one would then use that basted heart as a template. Cut a piece of paper the same size as the background fabric. Draw as line around the heart. Cut a heart shape out of the paper. Use it to cut the heart-shape hole in the background fabric but add a seam allowance, which would make a smaller heart shape.
Turn that seam allowance under as you baste the white background to the paper.
Then insert the basted heart into the basted background and whip stitch them together. With perfect cutting and perfect basting they will fit perfectly.
Detail of a German piece in
a traveling exhibit about intarsia work
Some of these shapes are outlined by another piece of fabric, which is probably a way of dealing with the seam allowance problem, and another step.
Remove the papers if you get around to it.
Quilt it if you like. The piece at the top is quilted; the one below is not.

Here is a detail of a silk quilt dated 1718 that belongs to the British Quilters Guild.
See the whole quilt by clicking here:
The silk is shattering in places allowing us to see the white paper that remains almost 300 years later.
Learn more about intarsia by reading this book: Tuchintarsien in Europa
It's the 2009 catalog from a traveling exhibit from the Museum Europäischer Kulturen in Berlin. This show will be in Leeds, England at the Leeds Art Gallery from August 27, 2010 to November 1, 2010. Check it out here: http://www.leeds.gov.uk/artgallery
And if you are not confused enough consider Charles Dickens's mid-19th-century discussion of patchwork in Household Words:
Now, there are many kinds of artistic productions which we feel disposed to call patchwork, for alike reason : marquetry-patchwork, parquetry-patchwork, buhl-patchwork, niello-patchwork, damascene-patchwork, enamel-patchwork; and we can assure any person who has not duly thought on the matter, that these various kinds of patchwork often call forth considerable grace, taste, and delicate art.


My, oh, my. I think I will stick to the freezer paper method. Thanks! :)
ReplyDeleteJust want to let you know how much I enjoy reading your blog. You have opened a whole new world to me. It is fascinating. I eagerly go to you blog each day to see what I will find. Thank you for sharing your vast knowledge.
ReplyDeleteSue
Very interesting. I love reverse applique (currently working on my second Dutch Treat quilt) and the differences between it and inlaid applique are fascinating.
ReplyDeleteIt looks beautiful, but confusing to me.
ReplyDeleteI was thinking of a cutout and laying a color underneath, but I guess that would be molas?
Debbie
My daughter and I are wondering if the edged intarsia pieces are not similar to the tiling effect seen in some 1920-ish crazy quilts? And yes, molas do come to mind. Reverse applique both pieces onto a backing piece, which is then trimmed away (or not?).
ReplyDeleteDale
The inlaid patchwork method is basically the same kiribame technique that was used in Japan. An intreiguing technique that must be due for a revival!
ReplyDeleteInlaid patchwork is a delight and provides so much more freedom than standard applique. Since visiting the exhibition in Germany mention above I've been creating some pieces of my own.
ReplyDeleteI recommend trying this technique for anyone who enjoys hand sewing.