Here's how WE stitch paper-pieced hexagons.
You baste or glue the fabric edges over paper.
Put the hexagons good sides together and stitch on the sides by
barely catching the fabric.
But I've been thinking about it and I'm beginning to
believe that we are doing it all wrong.
I read some 19th century how-to's and they do not mention placing the hexagons face sides together.
In particular, American Jane Cunningham Croly's 1886 book Ladies' Fancy Work.
She gives instructions for a mosaic patchwork window shade.
After turning over and basting the silk on the wrong side of the hexagons...
"The two are then exactly fitted and sewn together, according to the design."
Well, that's a little vague but the illustration is excellent, showing the whip stitching or over-and-over stitch in progress.
The stitching is about 60% done and it is done from the back with the pieces placed side by side.
In The Lady's Manual of Needlework, 1859.
"If you are going to do a large piece of work, it is well worth procuring a die for stamping out a pattern of each of the sections, as you thus attain an accuracy hardly otherwise procurable. With this you stamp out a number of pieces of stout writing paper; and then cover one side of each with the material, turning over the edges, and tacking them round. They are sewed together, on the wrong side, in their proper places, and the papers are generally, but not always, afterwards withdrawn."No how-to illustration.
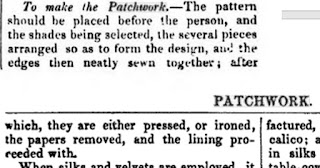
She also co-authored Treasures in Needlework with Eliza Warren in 1855 showing this well-copied illustration of mosaic patchwork ideas.
Instructions were more austere:
"The pattern should be placed before the person...several pieces arranged so as to form the design and the edges then neatly sewing under."
Most references I found do not tell the reader exactly how to stitch these.
Englishwomen's Sophia Caulfeild and Blanche Saward's 1882 Dictionary of Needlework:
"Take a dark coloured patch and sew round it six light patches."
Eliza Leslie's 1857 "American Girl's Book"
explains more about shading than technique.
"Sew together neatly over the edge, six of these patches, so as to form a ring."
I guess everybody knew how to do it.
Their grandmothers showed them.
Instructions were not worth the type.
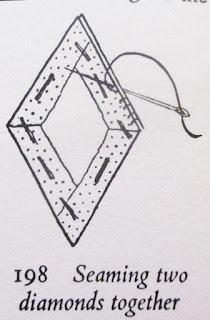
Little Wide Awake Magazine in 1881 told you to lay the diamonds out "before you with the point towards you and then sew on to the right hand...another of darker color."
Are we supposed to join them on the front? Illustrations would help.
So why do we do it this way?
I'm going to credit Averil Colby
She wrote the book on English Patchwork in 1958
And was quite a devotee of hexagon patchwork herself.
These scraps by her are from the Quilt Museum in the U.K.
And this is how she told you to do it.
Well, you can do it any way you want but I have been doing it the way Jane Croly showed it
Placing the pieces side by side and stitching from the back.
Stitches don't show and it goes faster.
I learned this method from Karen Tripp in her video on the "flat backstitch" method of joining
paper pieced shapes.
And a P.S.
Here's one of the patterns Matilda Pullan thought you might prefer to hexagons.
Yikes!
And this Mrs. Pullan pattern has always puzzled me.
Just how would you sew this with the good sides together?
Complex designs would work much better if you laid out the pieces adjacent to each other in pairs and flipped the pair over to sew.


I too use the flat back method for sewing my hexies together. I like not seeing my stitches on the front. It took a little getting used to but now it feels natural. I don't use tape or Wonder clips to hold my pieces together, just my fingers! Thanks for all you share!!
ReplyDeleteThat video is very convincing, I'll try it.
ReplyDeleteThose instructions for sewing togethet the diamond pieces that you just cut out with no seam allowances are hilarious, the farther down you read, the more tangled and nonsensical and the funnier they get!
It's hard to write comprehensible instructions for physical actions, thank heavens for videos and the Internet!
I recognized Jane's name right away. She began the woman's club movement in the U.S. Though I haven't read her fancy-work book it reminds me of Therese Dillmont's compendium (1884 and often-reprinted). I wonder if any of the women who tried to read and use those nearly-impenetrable instructions successfully completed any of the projects.
ReplyDeleteAs for hexies, I don't know if I followed anyone's instructions. It just seemed logical to put the pieces RST and whipstitch over the edge.
I'd be interested in learning more about Averill Colby. When needlework revived in the 1970's her books were among the few that were widely available. (How the Internet, Alibris, and the craft market have changed things!)
Thanks for the stitching lesson. It is way to late to teach this old dog anything new, but I like seeing other methods.
ReplyDeleteThanks for the great post. Yes, their grandmothers taught them, I like that. My grandmother taught me to embroider, on her lap.
ReplyDeleteI think Jane's method is practical, stitching from the back with pieces butted together is quicker with better results.
Part of art is smooth technique.
I use the flat back method too...as you say, much quicker :) thanks for the lessons!
ReplyDeleteThanks for the history lesson. I sew mine right sides together and my stitches don't show on the front. Pieces are easier to handle and my points always line up just fine.
ReplyDeleteI agree, RST whip stitched with silk thread leave stitches barely noticeable. The availability now of acrylic templates and paper pieces in an assortment of shapes and sizes is enormous help! THANK YOU to those manufactures!
ReplyDeleteHello! I tried sewing them face to face, but it never felt right and too much thread showed. The side to side method is much more comfortable for me, and like you said, less stitching shows. Your history lesson was very interesting. Thanks
ReplyDeleteI watched a video by Mickey Dupree and this is the way she taught it.
ReplyDeleteThanks Barbara for the shout out! Love the history of our craft!
ReplyDeleteKaren
As a small girl my wonderful Aunt taught me the flat back method of piecing and we never had a stich show. She aso taught me to save envelopes to cut up into hexagons as the paper was just the right weight - I'd be hard pressed to get enough envelopes in the mail these days to do that!
ReplyDeleteThat is quite revolutionary! Have always used the face to face method with glue basting and whip stitching with the finest thread. Will try the side to side method on my next block.
ReplyDeleteJust been reading about Lucy Boston. Apparently she did three whip stitches before pulling through the thread, so worked more quickly (than me anyway, who pulls the thread through every stitch).
VERY interesting!!! I’m a big fan of the RST whip stitch technique but will have to try the flat back method ☺️❤️
ReplyDeleteI've used the flat method for about 15 years. I use a buttonhole aka blanket stitch and, I also use mylar pieces instead of paper (found at brandysquilt patterns.com) Much preferred as the finished look is great. You can't see the stitches at all!
ReplyDelete