

I have kept this photo of some fairly sad blocks from an online auction for a while. They look to be from the 1930-1950 era.

It's an interesting block, if badly made, and I thought it might make a good pattern to use Moda JellyRolls, the precut 2-1/2" strips. But I had to figure out how to draft it. The photo isn't too clear. I was hoping to find it in BlockBase, my digital Encyclopedia, but where? was the question. There are not a lot of patterns that are constructed like this. It's kind of a log cabin....

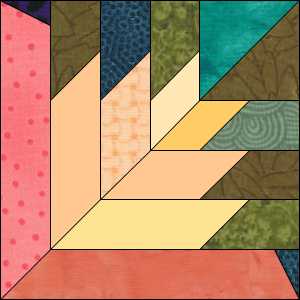
I saw it as a grid of 7 for proportion and drew it up from scratch in Electric Quilt.
I liked the cactus look and thought about Echeveria, the succulent, when I colored it.

Once I drew it up though I realized it had a diagonal seam, which encouraged me to look in BlockBase again in the rather small category of Two-Patch quilts.

Blocks divided in half diagonally.

And here is something very close to those original blocks.
A rather obscure pattern, #3177.
Modern Flame, published twice.
Once in Woman's Day magazine in September, 1942
And also by the Spool Cotton probably around the same time.
It is very modern looking.

The old blocks may have been made from one of those patterns, but unfinished without the last strips.
And when you look at the original pattern design you can see why.
There are those tiny corner pieces in the longest strips.
Well this would make an excellent block for 2-1/2" strips---a 12" block.
Except for those little corner strips which would drive you crazy. You can see why no ever one made it.
So back to my point, which is how I use BlockBase with EQ...

To fix BAD DESIGN. I imported the BlockBase block #3177 to my EQ file.

Then while I am in the EasyDraw mode I go up to the top left and highlight that little arrow which is called The Pick. When I am in that mode I click on a line and it highlights the offending line. And I can delete it.

Here's Block #3177 with an easier to piece outer strip.

It's probably a better design (based on a grid of 6) than my Echeveria based on 7.

But the Echeveria is so cactus-like I kind of like it.

In EQ I rotated the blocks around.

It's quite directional with a lot of possibilities.


Here's a free pattern with templates for a 7" version based on 1" finished strips. Click on the picture and print out at 8-1/2" x 11"
Or click for a PDF:
If you wanted to use 2-1/2" strips cut the square 8-7/8" and cut diagonally in half for the large triangles. You don't really need templates. I'd just join dark and light strips with a 45 degree seam and line them up to look spiky.

Thanks for sharing your process for redrawing old blocks. It's interesting to see how you tracked down the pattern and then created different options. I like pattern #3177. The green version of the quilt is quite graphical.But that little corner might be a pain so it's nice to see options.
ReplyDeleteAnd thanks for the free pattern.
Great post! Thanks for the explanation, and showing all the possibilities for the block.
ReplyDeleteI really enjoyed seeing your process. The vintage green and white version is interesting, and it's a little surprising that there wouldn't be more out there. Maybe we appreciate the "oddness" of it more than those of that era.
ReplyDeleteGreat visuals and thank you for the explanation about using the pick. I knew there had to be a way to do that!
ReplyDeleteGreat pattern.I love all the layout and seeing your process.Thanks for the tips and the template.
ReplyDeleteVery interesting post and an intriguing block. Thanks for sharing the fruits of your labor with us
ReplyDeleteI love the idea of using a block maker to design our own unique versions and it is nice to see things visually before we start the quilt.
ReplyDeleteDebbie
I can't get access to the pdf file. I sign in with adobe and it says document not available.
ReplyDeleteColleen--click on the picture just above the PDF address and save it to a word file. Then print it out so the square is 7", I'll work on the PDF access.
ReplyDeleteWith today's methods there's no need to worry about those small triangles at the end of the bottom strips. Instead of handling tiny pieces and trying not to let the presser foot swallow them, simply cut the smaller piece an inch or more longer, sew it to the longer bottom piece, press and then use your rotory cutter and acrylic ruler to whack off the extra fabric and cut the piece to length. One of the many ways initially oversized cutting can make construction much easier and more accurate.
ReplyDelete