Nineteeth-century quilters often free-cut stars for applique. The maker of this New Jersey album pictured in an online auction appliqued stars over the seam intersections.
The quilt looks to be about 1840-1860.
Spiky Stars by Deb Rowden, 2009
Deb Rowden interpreted an antique quilt for the American Quilt Study Group's Red and Green study a few years ago, appliqueing 16 free-cut stars just as the maker of her inspiration quilt had done. This old-fashioned technique allows you to create an impulsive look that is quite refreshing in our era of templates. See her inspiration at Stella Rubin's online shop.
We'll cut an 8-pointed star first. Fold the circle in half and then half again, etc. till you have it folded into a pie-shaped piece that shows 1/8th of the circle. Just like cutting paper snowflakes.
Press it so the creases are really in there.
Before you unfold it take a scissors and snip it in the creases.
Use a sharp scissors and snip through all the layers right in the creases.
The longer your slash the spikier the points on your finished stars.
Open up your circle.
Baste it or glue it to the backround.
Create the star points by folding under those edges. Do not trim them. Fold them under and applique them down.
You can be as precise or spontaneous as you like.
You can also make a six pointed star.
I reverse appliqued a hole in the center. You can layer circles on top of the star or do reverse applique.
Notice the shadow of the folded-under points above. That's usually not a problem. My imitation chrome orange fabric is pretty thin.
The only difference in creating a six pointed star is in your initial folding of the circle. Fold it into sixths instead of eighths.
And then there is the five-pointed Betsy Ross star.
American children are taught to cut five-pointed stars with the legendary story of Betsy Ross cutting one for George Washington and the first American flag. Historical bunk, but a fun way to learn to cut a five-pointed star. Most of us forget immediately.
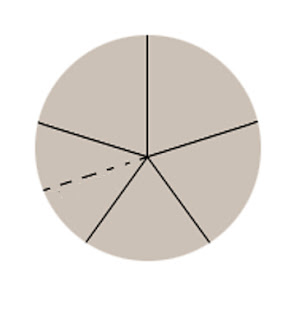
For a five-pointed star:
Again: Begin by folding the circle in half.
Then fold a piece over that is twice as wide as the section that is behind.
The proportions here are 1:2. The pinkish shape is twice as wide as the red shape visible here.
Fold the smaller flap backwards.
Press
This works better if you open it up before you slash it.
You'll see you have an extra line in the creases.
Ignore the extra crease.
Slash down the correct 5 creases.
The deeper the slash the sharper the points.
Fold under the points and hand applique.
In this block dated 1863 the maker laid a red five-pointed star atop a blue five-pointed star to get a 10-pointed star. There are many possibilities.....
See this great use of the free-cut star in another quilt from Stella Rubin by way of the Selvage Blog:


Lovely tutorial, will have to give this a go. As always your posts are so informative.Thanks.
ReplyDeleteAnother wonderful tutorial, I'm in love with those stars, several years ago I took a class with Linda Brannock and she folded her stars just like that.....thanks for reminding me of the process...
ReplyDeleteWendy
I love making wonky stars, just did some in a punched piece and use them in my pennies. Love that last block, really nice one to reproduce into a wall hanging.
ReplyDeleteDebbie
great tutorial! I've never seen this method before, maybe that's why stars have intimidated me in the past. I'll try your method.Thanks!
ReplyDeleteAha! What a great technique! So simple! Just takes any mind-bending sort of math ridiculousness right out of the way. I love how these stars look and the borders too. Sorry, I am gushing, it's just so liberating and I never thought of it...Now I can have the zigzaggy edges anywhere I want and it's easy peasy! Thanks, Barbara!
ReplyDeleteThanks for sharing. I didn't realize how easy these would be. I had a much more complicated method in my mind.
ReplyDeleteExcellent descriptions of technique to make stars. Thanks.
ReplyDeleteThank you for a great tutorial!
ReplyDeleteI have a quilt given to my mother from my grandmother that was made in "1860 or before" by my great, great, great grandmother, Joanna Miller. They were from Carroll County Maryland. I would like to send you pictures of the quilt and get your opinion. Is it possibility a "Freedom Quilt"?
ReplyDelete