Monday, July 28, 2014

Shirting Document Print for Richmond Reds

Raleigh print in Shirting Cream

My new 19th-century reproduction Richmond Reds collection for Moda
is due for delivery mid-September, 2014

which means the precuts like Jelly Rolls and Layer Cakes should
be available soon.

There's a full-page ad for it on the first page of this months
Quilt Mania.

Several of the prints are available in a "Shirting Cream" colorway, such as
Raleigh (8304-11)


Here's the original document print for Raleigh--- a shirting with berries and sprig figure in a dark brown or black. Over the many decades the background has yellowed as cotton does with age.
We kept the aged look in some of the colorways, adding a touch of pinkish tan because the line is called Richmond Reds.

A shirting is a term for a light colored fabric with a simple, small figure.


This colorway is an echo of the very serviceable 19th-century
shirtings that were so popular for children's clothing
as in this lot from Augusta Auctions that look to be from the time of the Civil War
or earlier.


The fashion continued into the 20th century, Many of the kids in this one-room school from 1909 are wearing light prints.

Shirtings were also a necessity for scrap quilts.


All these auction quilts look to be about 1870-1920,
shirting's heyday. 


And not so scrappy quilts until 1930 or so.


See another post about vintage shirtings:

Thursday, July 24, 2014

Ladies Album: Stencilled Signatures

Not all the inked signatures in Ladies' Album quilts are handwritten.
Many are stamped (perhaps the one above) or inked with a stencil
as in the two below.


Note the breaks in the lines in the letters A and S and m,
indicating a stencil rather than a stamp.

The same way the m is broken here.


Above is a wooden stamp on a larger scale for a grain bag,

a useful item in Europe when grain bags
identified the farmer or the miller's name.


Stencil plates on a small scale were popular in the mid-19th century in the U.S.
The above examples of metal stencils are from the collection of the International Quilt Study Center
and Museum.


The popularity of stencil plates was probably due to
companies that marketed "Name Stencil Outfits " to
people who were looking for a small business. One often finds
ads for name stencil kits in the ads in newspapers and ladies' magazines.


Above is some history from a 19th-century book, saying that the outfit consisted of several tools, and some metal plates with an "alphabet of dies for cutting ornamental designs." The outfits were expensive (see an ad below for someone who bought one for $23 and was willing to sell it for $7.)

\


Read a catalog of the S.M. Spencer company, which advised:
"There is a Universal Necessity for Stencil Work. A thousand and one articles are owned by each individual in the land which should be marked plainly with their name. Clothing, hats, bonnets, gloves, boots, umbrellas, books, cards, envelopes, writing paper, blankets, boxes, barrels, merchandise, farm tools, robes, etc., etc., etc., all may be neatly and quickly marked by means of a Stencil Plate. Every day, clothes are being lost and stolen, books and tools loaned and never returned, letters sent to the dead letter office, (etc.etc.etc.)"
http://archive.org/stream/catalogueofimpro00smsp/catalogueofimpro00smsp_djvu.txt

Big Pay! Who could resist?

From the photos it's often hard to tell if the signature is a stencil
or a stamp.


Possibly stamps from the same designer....


Louisa Sheley


Probably stencils....

or a very neat hand.

Read about a Spencer stencil outfit owned by Princeton University here:

https://blogs.princeton.edu/graphicarts/2013/07/stencil_kit.html

Sunday, July 20, 2014

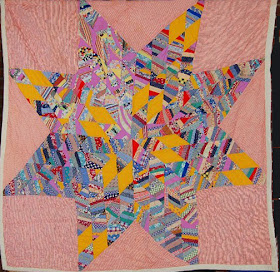
String Stars on a Large Scale

Tudor Family, Lexington, Kentucky, about 1900

Towards the very end of the 19th century quilters began combining
a new idea---string quilts--- with an old idea----Lone Stars.

By Bertha Riddick from the Quilt Index
and Michigan State University Museum.

These first two full-size quilts date to the first quarter of the 20th century. 

By Amelia Etta Atkins, Henry County, Tennessee
 Quilts of Tenneseee

Many of those string-pieced diamonds were probably
stitched from factory cutaways.

A top from Ann Champion's cupboard.

I would imagine most were pieced over newspaper foundations.


Annie Belle Hodges Brown
Quilts of Tennessee

Add more stuff---but not too much.

These last two from online auctions look a little later, probably
after 1925. The pink one seems to have a rayon sateen
background.

By Geneva Rankin Shows

You can get the idea for a small-scale version here at a tutorial at Little Miss Shabby.
http://www.littlemissshabby.com/2012/08/string-star-tutorial/


Carol sent a picture of this six-pointed version, less common.

And here's a great update found on Karen Griska's Selvage Blog


Wednesday, July 16, 2014

Too Many Y SEAMS???

Madison Star by Nan C.

Jean Stanclift

For the free block of the month I am doing in 2014 at my Civil War Quilts site I thought up new variations of stars. The star in a star above I named Madison Star after Madison, Indiana. See the story and free pattern:

Madison Star by Becky Brown

I Photoshopped 25 of Terry's to make a digital quilt.

And here are nine blocks alternating dark backgrounds and light.
The blog readers have gone in many different directions with this star. Below are
examples from our Flickr page:


Colvinkiwi

Christine

Cookie'sCreek

DebraR

Denniele

Denniele

Dustin

Ed

Jean

JeanneA

Jelibet

JHalasey

JLMeadowlark

Kathie

Leonie

Mulehill

PennyCat

PinkDeenster

Rachael
Note Rachael added a seam to the edge pieces
to avoid Y-seams there.

RCCheryl

Rosemary

SarahV

Sheila

StitchnKnit'sMom

StitchnKnit

Susan

SusieK

SuzieK

SylvieD

 Terry


Above is one posted at Sheryl's Temecula Quilt Company blog

And Dustin's all ticking version

I love this collaboration. I think up hard blocks. You good stitchers sew them!

I added this paper foundation pattern for the star point. Be sure the box prints out 7" square.

To print:
  • Create a word file or a new empty JPG file that is 8-1/2" x 11". 
  • Click on the image above.
  • Right click on it and save it to your file. 
  • Print that file out 8-1/2" x 11". The side of the box should measure 7."  Adjust the size if necessary.