Friday, May 30, 2014

Pat L. Nickols Quilt Collection

From the Pat L. Nickols Collection at the Mingei Museum in
San Diego

Hexagon charm quilt

Log Cabin 

Collector Pat L. Nickols donated her collection of 300 quilts and tops to the Mingei Museum of Folk Art. They are showing log cabin quilts in San Diego right now through July 3rd. UPDATE: Pat corrects me and says it is 350 quilts.

The New England Quilt Museum is showing a selection of her charm quilts through July 6, 2014. See Charmed: Every Piece is Different at their website:
In a charm quilt no two pieces are alike. They are usually
pieced of one template pattern, above a 4-sided piece called tumbler.

You can enjoy Pat's collection at home by clicking on the online catalog here:

The Quilters Guild of Dallas funded the digitization.

An unusual charm quilt in a tile pattern, pieces
appliqued to a white background.

Right angle triangles, arranged according to color value.

Thanks to Pat for her generous gift.
And to the Quilters Guild of Dallas.

Tuesday, May 27, 2014

Maple Island and Modernism

BQ4 Quilt from Maple Island Quilts,
kitted up
in Modernism from Moda, 60" x 72"


Creations, a shop in Kerrville, Texas, has kitted the BQ4 pattern in my Modernism collection. It's a great idea.


Modernism from Moda


Maple Island sells several patterns combining line with big areas of color.
Here I've done a digital sketch of their BQ in my Modernism.
This design uses squares instead of rectangles atop the grid.


See Creations webpage here to buy a Modernism kit for BQ4 and backing:

http://webstore.quiltropolis.net/stores_app/Browse_dept_items.asp?sid=9867810647269867&Store_id=982&Page_id=17&categ_id=22&parent_ids=0,21&name=Quilt+Kits

And see the patterns at Maple Island Quilts here:
http://www.mapleislandquilts.com/quiltpatterns.asp

See more about Modernism here:

http://storefront.unitednotions.com/storefrontCommerce/search.do?searchType=keyword&keyword=modernism&emailAddress=

Saturday, May 24, 2014

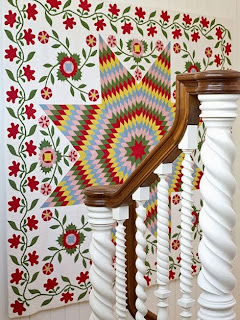
Star + Conventional Applique = A New Look

Large central star quilts changed when applique fashions changed
in the 1840s.

The rather frilly cut-out chintz details became old-fashioned,
replaced by an interest in the bolder Pennsylvania-German style
florals

Red and green applique began to dominate in that decade.

Providing a clue to date...if the applique is conventional applique
rather than cut-out chintz (Broderie Perse)
the quilt probably dates from 1840 or later.

Lucy Shephard Loomis, dated 1852,  Massachusetts
 from With Heart and Hands


Often the quilt artist chose a conventional block for the empty spaces, here a Whig Rose or Rose of Sharon

A lovely combination of oak leaf and reel in indigo prints from the 
collection of the International Quilt Study Center.


Some Baltimore-ish looking corners and edges.

Carolina Lilies

A nicely balanced piece.

Perfection:
From the Pilgrim-Roy collection on display at the Boston Museum of Fine Arts.

These work so well it's surprising there are not more.

Teddy Pruett is holding a crib quilt
with the star on a different axis.

A silk quilt by Hannah Smith of Brooklyn
in the collection of the Kansas City Museum,
about 1851

The patriotic theme is a subcategory.

Prussian blues and rainbow prints----wow!


Some are more organized than others....
This one is dated 1858-1923
by the Shephard/Temple family


An old black and white picture from the morgue of
the Baltimore Sun

As the 19th century passed we see new trends.

From RickRack Quilts
More color in the background...

From the cover of the California project book
Ho for California....
These intense backgrounds were in favor in southeastern Pennsylvania
from the 1870s into the 20th century.


Mennonite quilt with Princess Feathers corners
From Woodward and Greenstein

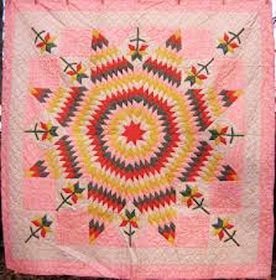
The star here is pieced of the new shades of the 20th century, claret red, indigo, gray and black. You don't often see these calicoes combined with applique. As they were coming into fashion, applique was going out.

Except among the various Pennsylvania-German communities.


Wednesday, May 21, 2014

Becky Brown on Fussy Cutting

"Thrifty" from the Austen Family Album by Becky Brown

The BlockBase sketch I gave her of  "Thrifty."

Fussy-cutting Queen

She sees a lot more potential than I do.


I am thrilled that Becky Brown has been making the models for my various blocks of the week and blocks of the month. She is a great stitcher and she really knows how to make the most of the fabrics. 

Over on those free BOW and BOM blogs she's created a flurry of fussy cutting. See the links in the left side column.

Amethyst from the Grandmother's Choice BOW by Thalia T.

Jack's Delight from the Grandmother's Choice BOW by Thalia T.
Thalia is another fussy-cutting fan.


Here's Barbara's plan for Block #5 in the Austen Family Album 
with a simple square on point in the center.

Becky sees that big area as an opportunity to really show off the fabric.
She often cuts squares into 4 triangles to create a kaleidoscope effect.

Readers have been asking how Becky does it so she's written a post here explaining her methods for adding pieces and interest to the blocks---her words in purple:

"The success of fussy cutting is more about the fabric than just the sewing, as evidenced in the simple block above. The dramatic center square is composed of 4 fussy cut triangles.... 'Fussy cut' meaning carefully choosing the place on the yardage to cut the triangle."


First she adds more seams and makes a plastic template.

"I use Shrinky Dinks Frosted Ruff 'n Ready plastic to make templates. The frosted side is easy to mark with placement guidelines. "


The formula here for the template: Take the finished size of the square and add 1-1/4 inches to it.

Then cut your clear plastic template
with two diagonal cuts. You only need one of those triangles for a template.

Becky's template...

Photoshopped to show the cutting and placement lines.


The template includes seam allowances.On this template I marked a vertical line and a horizontal line just to keep everything straight. (For this example I marked around the edge in red to help you see it better.)

To make your template: Tape the plastic sheet to your cutting mat, mark it where you want to cut and do so with a rotary cutter (not the one you use for fabric) or an Exacto knife. 
A mirror image

Not mirror image---Becky's dog Oreo

Position the template so the right and left sides are mirror images, in other words, the same---but reversed.
Cut the first triangle. I do this with a rotary cutter. 

(Once I have cut my first fabric triangle I do NOT use the plastic template for the other triangles. You could label it and keep it for future use, or do like I do and throw it in a pile with other unidentified plastic templates that always get mixed up.)

4 identical pieces

I use the fabric triangle to cut the remaining pieces. Keep your fabric straight and position the cut triangle over the fabric so that it exactly matches up and rotary cut the next piece, being careful NOT to cut the top triangle.

Now the fun begins when you have your 4 triangles and put them together. If you have cut accurately and sewn accurately you will get good results.
Here's a detail of a small square Becky has fussy cut.
Tips for fussy cutting: 
  • I seek out fabric with a repeating pattern: Stripes, either floral-ish or strong geometrics always give dramatic effects when fussy cut.

Stripes from Barbara's Metropolitan Fair line last year


  • Starch your fabric BEFORE you cut it out, making sure you keep the grain lines straight so nothing gets distorted. My preference is spray starch I get at the grocery store. Spray it on the front and/or back of the fabric so that it feels like lightweight paper. Starch makes machine piecing more accurate; just remember to do it before you cut out the pieces, never after. 


  • Avoid putting a prominent part of the fabric at the center point. (notice how I used a place on the fabric that would be forgiving). You do not want the focal point of the square to call attention to a little distraction.

  • If you are reluctant to start cutting into beautiful fabric, make some photo copies of your fabric and experiment with cutting paper. I think you'll be amazed with the results and well on your way towards seeing fabric in a new way and a devotee of fussy cutting!


Oreo fussy-cut in kaleidoscope fashion.
You get a different look if the triangles are not a mirror-image repeat.